First steps in Model-based testing
or: How I learned to generate tests
Model-based testing is the process of creating a model (an abstract version) of the behaviour of a system. Then executing the model so it is run over an implementation. Then validating that the system under tests behaves the same way as the model.
Before we start there are multiple types of model-based test. The one we will explore is state chart powered model-based testing. This is an early exploration of the ideas around model-based testing and as such will develop over time.
I will start by introducing the pieces of a model-based test and how they fit together, then go through what is being tested.
What do we need for a model-based test
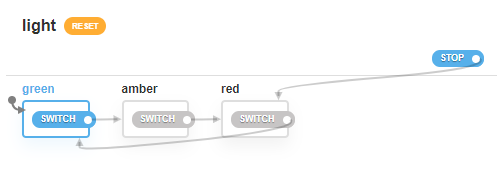
To write a model based test for a component, you need a state chart. This state chart will define the states of your component, and the events that transfer between the states.
This state chart was created using XState, and it’s visualiser:

Then from the state chart using graph theory you are able to generate a series of paths, that step through through each state via an event. The above state chart generates the following paths:
graph LR
G1[green]

G2[green] -->|SWITCH|A2[amber]

G4[green] -->|SWITCH|A4[amber]
A4 -->|SWITCH|R4[Red]

G3[green] -->|SWITCH|A3[amber]
A3 -->|STOP|R3[red]

G5[green] -->|STOP|R5[red]
Once we have the paths, we need a way of interacting with the component to trigger the events that are on each step of the path. This is where something like DOM-testing-library is very useful. We can say given the state is Green and when the event is Switch then find the Switch button on the page a press it.
A lookup can work here:
const triggerEvents = {
	green: {
		SWITCH: (container) => fireEvent.click(getByText(container, 'Switch'))
	}
};
This leaves us with the job of validating that we are in the correct state after each event. This is where we use the testing library to confirm that we are in the state we expect.
const compare = {
  green: container =>
    expect(getByTestId(container, "state-value").innerText).toBe("green");
};
Run your tests iterating through each path and you will cover the routes through your application.
What got tested?
Firstly we have tested that the the events are triggered as expected. In the above example we are expecting to find an element with the word “Switch” and for that element to be clickable.
Are first test is: “Do the triggers we expect exist in the component”.
This leads onto a side-effect of the trigger testing. If you have an event but no way of triggering it, then those tests won’t run.
The next test is that the states transition as expected. If your event trigger takes you to somewhere not expected. Then the test will fail.
The next overall test is: “Do the triggers transition the state correctly”.
What does it look like in practice
Here is an early example using XState and react-testing-library to model, implement and test a simple state chart. It generates the paths using @xstate/graph and then uses a lookup for the events and the state validation.
Conclusion
Model-based testing is a fascinating tool, generating the paths through an application or component and then confirming the implementation traverses the paths correctly is a powerful way to test a code-base.
Thoughts from me
This is a topic I am still in the early stages of exploring and leaning heavily on XState and GraphWalker for my understanding. I need to cover more complex charts, fit in context, understand how to use example and property based testing for more complex interactions, e.g. things like forms; and how to treat multiple transition event triggers for the same path, e.g. testing mouse and keyboard interactions.